Wednesday, March 21, 2012

Light Graffiti

Mom came over for dinner yesterday and we had a go off light graffiti. You turn on the camera in a dark room with a low ISO (whatever that means) and a slow shutter speed, and then stand facing the camera and jump around like a loony drawing pictures with a torch.

This is a lovely house with a tree. The door is running way from the rest of the building.


And this is a vaguely recognisable attempt at music on a stave. Clearly practise is called for. 


Tuesday, March 13, 2012

Picture Frame!

We have lots of lovely pictures to hang up around the house, but no frames for any of them, so we recently looked into getting them framed. It turns out this costs a fortune, so we're going to have a crack off it ourselves. The first picture to get framed is going to be a nice one Hugh got for me in Bali last year. It's a stretched canvas, but he had to take the canvas off the frame coming through customs, so step 1 is making another canvas stretcher. 

Sophie and Jess came over to give a hand. We cut pieces of timber down to the correct size using a saw and a mitre box. Pretty time consuming, but very satisfying to make it all manually. Next time we'll definitely borrow John's powered mitre saw. 

Here are the pieces cut and ready for assembly. Jess is desperately trying to avoid the picture. 


Sophie brandishes her saw arsenal.


And here's me with the and Sophie with the first corner stuck together.


It was a bit trickier than I expected. First we held the 2 outer pieces together really hard while Sophie ran a 4mm drill through the outside at a 45 degree angle. Then we spread glue everywhere and stuck a 4mm dowel through. The little corner piece is to give extra strength, and also to make sure that everything is aligned properly. The elastic bands everywhere are holding it together. Now to wait for it to dry. I'm starting to see why it is so expensive to get this done professionally!

Sunday, March 11, 2012

Vegetable Rotation Plan

We have 4 main beds for growing vegetables in, so a 4 bed rotation plan makes lots of sense. Growing the same stuff in the same spot each year makes it very easy for diseases to build up in the soil. Rotating everything over 4 or even 6 years means that the diseases that attack specific plant families don't have a chance to get any footing. In our allotment in London the previous occupant had grown alliums all over the plot and they went to seed. By the time we got it, the whole place was rife with white root rot, so no alliums would grow.

I've checked the spacing in the square foot gardening guide for each of these. Some seem quite adventurous - 16 onions in a square foot, for example. My squares are only 25cm though, instead of the 30cm that would match a foot, so I'll probably reduce the spacing a tiny bit for anything that looks like it would get very cramped.

We filled and reticulated the 4 main beds this weekend, so planting will start any day now!


Wednesday, March 7, 2012

Herbs!

We finally get to start planting, now that the garden is pretty much there. First of all, Hugh ran a pick-axe through the bases of the beds to break up the compacted gravel. Worms and things like that will hopefully appear once there is nice fresh soil to be had, so having an inch of solid lime in the way wouldn't help much. Also we needed to break the weed fabric for the same reason. 


Here are 2 metal tins I found in the shed for growing mint in. Mint will grow all over the place if it is not contained, so i put some drainage holes in the bottom and a few bits of broken pottery. This make it easier for water to escape, so the mint doesn't end up in a bog.


Then pop them into the bed ...


And add loads of soil. This is veggie mix from Soil World. A ute load costs $56 and it ended up filling 2 1m x 1m beds and 1 2m x 1m bed. Not bad for giving everything a great start!


These brown pipes are suitable for reticulating under mulch. They have drip holes along the length of the pipe, but they way they are made is like a valve system. When the water isn't flowing, it still holds a bit of pressure so dirt can't get in.

We have added a switch to the black pipe leading into this bed. This is so we can turn off the water if we need to while the bed is fallow at any time. Probably not necessary for perennial herbs, but who knows where we may move these to in the future. All the beds will get this.


And then tadaah - herbs! We have divided the bed into a grid using thumb tacks and twine. Easier than wood, but just as easy to see.

Monday, March 5, 2012

Haunching

We got all the paving haunched this weekend so now it's pretty much done. There's still a lot of sand we need to sweep off, but there's no harm in that staying for a bit longer, as it fills up all the cracks between pavers. Hugh has turned into an expert cement mixer. Here he is with our trusty wheelbarrow


And here he is tucking cement in between the paving and the wall. It took a few hours to get through it all, and we got a fair few blobs of cement onto the pavers, but all in all it was easy enough. The mistake blobs brush off easily when it's dry, so now it's all ready to go with the planting! 


You can just about see our fruit sticks in the background. They are gradually filling up the space along the borders. No fruit this year except for a few teeny weeny peaches, but we should start getting a few bits and pieces next summer.

Sunday, March 4, 2012

Loads of Concerts

It's been a busy few weeks of concerts in JSR. The school built a new organ in the chapel last year and it is finally complete and being played loads. It sounds amazing. It has been set up with a volume perfect for the chapel, and each note is perfectly clear. Even the low notes which are usually lost in a blasty mess are amazingly clear. 

This is the staff concert, where each music teacher is given the chance to show off their skills and instrument to win more students. All these pictures as blurry as I really have no idea how to take photos in the dark, but you can still pretty much see what's going on. 

Hugh's trombone quartet. 


Here is Nicole on clarinet accompanied by Jonathan on piano and Hugh turning pages.


And Jamil, Hugh and Andrew doing some unaccompanied singing.


This is all the staff who performed playing "You've got a friend in me" at the end.


And here is the star instrument of the moment, the beautiful new organ. Jonathan played an opening recital last weekend and it was amazing. He also played Peter and the Wolf with brass quintet yesterday, where Hugh played trombone. It was a really good arrangement. Jonathan was the bird, among many other things, and Hugh was the cat.

Sunday, February 26, 2012

Very very very nearly finished ...

Richard did a fantastic job on the back yard but just ran out of time to complete it, so myself and Hugh put in the finishing touches over the weekend with lots of help from Dave.


I finished off laying the flat sections and did the brick cutting (much to the amusement of Mom who says we should be playing the baby Mozart and not "brick saw"). Richard had done most of this already so it didn't take too long. Also he had done the hard part of preparing the ground and making it properly flat. 


In the meantime, Hugh and Dave laid the pavers on the slope leading from the bottom to the middle section. Pavers on flat ground can be laid on sand, but the slopes needed to be laid directly into concrete. We had no idea where to start with this, so Dave was invaluable. They did a fantastic job of making a lovely slope, not an easy task. 


So this is what the place is looking like now. The flat levels still look yellow, but it's because we have heaps of sand on the pavers to fill the cracks. Next weekend we will do the haunching - patting concrete around the edges so the side pavers don't come loose when people stand on them. And we will sweep in the rest of the yellow sand and some white washed sand, which is very very fine grain and will fill up all the cracks.


And this is the view from the top corner of the garden. We will put a little table and chairs up here and will have a great view of the vegetables and chickens when it is all established.

Thursday, February 23, 2012

Herb Bed

Richard is nearly finished in the garden, and I'll put up pictures soon, but for the moment I'm busy getting excited about actually getting to plant stuff in the vegetable beds. The first one we will tackle is the closest to the tap and closest to the house. It is a 1m x 1m bed and will be exclusively for herbs and leaves.

I've been thinking around in circles of how to plant this bed, as half the herbs I want to plant are perennials and so will stay in place once planted, and the rest are annuals, so will need to be replanted constantly. I came across a great method called "Square Foot Gardening" developed by an American chap called Mel Bartholomew in the 80s. Here's an example from another garden:


The idea is that you plant everything in raised beds, which you divide up into 1 foot squares. You think of everything you plant then in terms of a single square foot, and there is a list of how many of each type of plant you can fit in each square. So in our bed we will fill it with compost, lay reticulation, then mulch, and lay down a 25cm grid (close enough to a foot to still work) made of thin strips of wood. Then to plant each seed we will scrape back a bit of mulch and plant in a little hole. As the plant grows we can tuck the mulch back in around to conserve water, and still be able to see the grid.

No digging is needed between seasons, it seems, so i'll add a handful of good compost with each seed that gets planted to start a good habit and water with chicken poo water (water with a bit of chicken poo in - high tech) to keep the soil good.

This is what I'm hoping to plant, and need to pick whether we'll go from seed or get little starter plants. Maybe plants for the perennials and seed for the annuals. The perennials take up the top half and are taller (hence being at the northern end of the bed) and the annuals are at the bottom in the southern half.

The number under the herb is the amount that can be planted in the square. For 1 plant, it goes into the middle. For 4, it is planted in a 2 x 2 grid. For 9 it is a 3 x 3 grid. Carrots and little things like beets and onions get put in up to 16 per square.

This method is claimed to produce the most output from the least space and water. Mel says that a well prepared system can take as little as 1 hour of gardening input time a week to maintain, as weeds are not really a problem as there is no space left for them! Rows make sense for a large field where you need space between to walk/drive on, but in a little bed like this we will never stand in it and it will be filled with great rich soil all the time, so we can grow very intensely. It sounds pretty promising!

Hopefully this will all kick off next weekend and I'll get lots of pictures up. Fingers crossed for square foot gardening!

Saturday, February 18, 2012

More Progress


Richard has been flying through the garden. He's removed all the sand from the top level...


And then laid down heaps of gravel and compacted it with a large petrol compactor. 

This is the collection of pavers that Hugh, Dave and Greg collected a few weeks ago for the job. We got them from all over the place. Mainly Gumtree, and some recycling yards. I especially like the yellow ones. They had been sitting in a church yard for ages with bore sprinklers firing at them, so they have picked up deadly colours. 


Richard has also been putting the raised beds together.


And this is the amazing almost finished product - the top level...


And the middle level. As you can see, on top of the compacted gravel, Richard put down yellow brickies sand. He's been paving around the beds with a mix of all the pavers. The pavers sitting on their sides are waiting for a brick saw so he can cut them into a more fitting size. Another few days and it will be complete!

Tuesday, February 7, 2012

The garden is getting Richarded

Richard has started work on paving and laying the raised beds in the back yard. This is a picture from each morning so far.

This is the starting point. Note the mountain of sand on the middle level.


And here, after day one, half of it is gone!


And after day 2, you can actually see the back wall. Amazing! Richard reckons one more day and he'll have the sand from the bottom and top layers cleared too, so he can get cracking on compacting by tomorrow.

Thursday, February 2, 2012

Raised Vegetable Beds

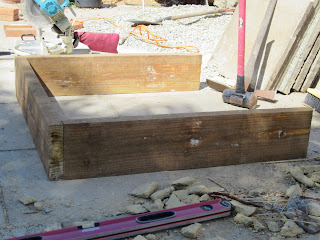
We are really getting into the garden with bells on now, so we have started preparing for the raised vegetable beds. We are making them out of "railway sleepers" - not real railway sleepers, but what passes for sleepers in our local garden center. They are a nice size = 200mm x 50mm, so should make for nice high beds. We can put on a second level for things like carrots which need deep roots, but for the moment we'll stick to one. 

This is the timber. We bough a load of 3m lengths to make a combination of 1m x 1m and 2m x 1m beds, so we borrowed John's mitre saw to cut them down to size. That thing goes through timber like it's cheese. 


This is what the 1m x 1m beds will look like. We haven't screwed them together, as the wood is really heavy. Richard will be installing them while we are at work, so I think they will be too heavy even for that superman to lift solo. With the pieces cut, he can make them as he goes, and hopefully that will be easier.


This is what the corners will look like. Butt joints, i think they are called. You simply lay the long end of one up against the short end of the next, and run a screw through the short side into the adjoining piece. We also have right angle brackets to screw the corners together from the inside, to give extra strength. When they are screwed together, they will line up nicely.


And here is the giant pile of timber ready to be assembled - enough for 2 1m x 1m beds, 2 2.4m x 1m beds and 4 2m x 1m beds. I think that should be plenty for all our fruit, veg and herb needs. We will reticulate each bed individually, so the water can be turned off when the bed is fallow. Mom reckons we'll be like the people in "The Good Life".

Sunday, January 29, 2012

Retaining walls finished!

After months of digging and building retaining walls, we are finally finished and ready for Richard to come in and pave the area now. The first is the view from the back of the garden, and the second from behind the house.


The highest level has been around for a while and contains fruit vines and trees. We recently reticulated it and now the things we planted are actually starting to grow. When all the vines are fully established they should block out the gray wall behind them. That's the hope anyway.

The middle and bottom levels are going to have raised vegetable beds on, surrounded by paving. We were quite surprised by the gradient of the garden once we started building the walls. By eye, we reckoned there to be a drop of a few feet, but there is around 2m drop from side to side.

We built the last back wall over the weekend. This will allow us to carry on the row of fruit trees and vines around the perimeter to the ponytail tree. We should get these planted up and reticulated next weekend.