Sunday, February 26, 2012

Very very very nearly finished ...

Richard did a fantastic job on the back yard but just ran out of time to complete it, so myself and Hugh put in the finishing touches over the weekend with lots of help from Dave.


I finished off laying the flat sections and did the brick cutting (much to the amusement of Mom who says we should be playing the baby Mozart and not "brick saw"). Richard had done most of this already so it didn't take too long. Also he had done the hard part of preparing the ground and making it properly flat. 


In the meantime, Hugh and Dave laid the pavers on the slope leading from the bottom to the middle section. Pavers on flat ground can be laid on sand, but the slopes needed to be laid directly into concrete. We had no idea where to start with this, so Dave was invaluable. They did a fantastic job of making a lovely slope, not an easy task. 


So this is what the place is looking like now. The flat levels still look yellow, but it's because we have heaps of sand on the pavers to fill the cracks. Next weekend we will do the haunching - patting concrete around the edges so the side pavers don't come loose when people stand on them. And we will sweep in the rest of the yellow sand and some white washed sand, which is very very fine grain and will fill up all the cracks.


And this is the view from the top corner of the garden. We will put a little table and chairs up here and will have a great view of the vegetables and chickens when it is all established.

Thursday, February 23, 2012

Herb Bed

Richard is nearly finished in the garden, and I'll put up pictures soon, but for the moment I'm busy getting excited about actually getting to plant stuff in the vegetable beds. The first one we will tackle is the closest to the tap and closest to the house. It is a 1m x 1m bed and will be exclusively for herbs and leaves.

I've been thinking around in circles of how to plant this bed, as half the herbs I want to plant are perennials and so will stay in place once planted, and the rest are annuals, so will need to be replanted constantly. I came across a great method called "Square Foot Gardening" developed by an American chap called Mel Bartholomew in the 80s. Here's an example from another garden:


The idea is that you plant everything in raised beds, which you divide up into 1 foot squares. You think of everything you plant then in terms of a single square foot, and there is a list of how many of each type of plant you can fit in each square. So in our bed we will fill it with compost, lay reticulation, then mulch, and lay down a 25cm grid (close enough to a foot to still work) made of thin strips of wood. Then to plant each seed we will scrape back a bit of mulch and plant in a little hole. As the plant grows we can tuck the mulch back in around to conserve water, and still be able to see the grid.

No digging is needed between seasons, it seems, so i'll add a handful of good compost with each seed that gets planted to start a good habit and water with chicken poo water (water with a bit of chicken poo in - high tech) to keep the soil good.

This is what I'm hoping to plant, and need to pick whether we'll go from seed or get little starter plants. Maybe plants for the perennials and seed for the annuals. The perennials take up the top half and are taller (hence being at the northern end of the bed) and the annuals are at the bottom in the southern half.

The number under the herb is the amount that can be planted in the square. For 1 plant, it goes into the middle. For 4, it is planted in a 2 x 2 grid. For 9 it is a 3 x 3 grid. Carrots and little things like beets and onions get put in up to 16 per square.

This method is claimed to produce the most output from the least space and water. Mel says that a well prepared system can take as little as 1 hour of gardening input time a week to maintain, as weeds are not really a problem as there is no space left for them! Rows make sense for a large field where you need space between to walk/drive on, but in a little bed like this we will never stand in it and it will be filled with great rich soil all the time, so we can grow very intensely. It sounds pretty promising!

Hopefully this will all kick off next weekend and I'll get lots of pictures up. Fingers crossed for square foot gardening!

Saturday, February 18, 2012

More Progress


Richard has been flying through the garden. He's removed all the sand from the top level...


And then laid down heaps of gravel and compacted it with a large petrol compactor. 

This is the collection of pavers that Hugh, Dave and Greg collected a few weeks ago for the job. We got them from all over the place. Mainly Gumtree, and some recycling yards. I especially like the yellow ones. They had been sitting in a church yard for ages with bore sprinklers firing at them, so they have picked up deadly colours. 


Richard has also been putting the raised beds together.


And this is the amazing almost finished product - the top level...


And the middle level. As you can see, on top of the compacted gravel, Richard put down yellow brickies sand. He's been paving around the beds with a mix of all the pavers. The pavers sitting on their sides are waiting for a brick saw so he can cut them into a more fitting size. Another few days and it will be complete!

Tuesday, February 7, 2012

The garden is getting Richarded

Richard has started work on paving and laying the raised beds in the back yard. This is a picture from each morning so far.

This is the starting point. Note the mountain of sand on the middle level.


And here, after day one, half of it is gone!


And after day 2, you can actually see the back wall. Amazing! Richard reckons one more day and he'll have the sand from the bottom and top layers cleared too, so he can get cracking on compacting by tomorrow.

Thursday, February 2, 2012

Raised Vegetable Beds

We are really getting into the garden with bells on now, so we have started preparing for the raised vegetable beds. We are making them out of "railway sleepers" - not real railway sleepers, but what passes for sleepers in our local garden center. They are a nice size = 200mm x 50mm, so should make for nice high beds. We can put on a second level for things like carrots which need deep roots, but for the moment we'll stick to one. 

This is the timber. We bough a load of 3m lengths to make a combination of 1m x 1m and 2m x 1m beds, so we borrowed John's mitre saw to cut them down to size. That thing goes through timber like it's cheese. 


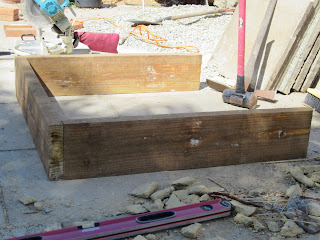
This is what the 1m x 1m beds will look like. We haven't screwed them together, as the wood is really heavy. Richard will be installing them while we are at work, so I think they will be too heavy even for that superman to lift solo. With the pieces cut, he can make them as he goes, and hopefully that will be easier.


This is what the corners will look like. Butt joints, i think they are called. You simply lay the long end of one up against the short end of the next, and run a screw through the short side into the adjoining piece. We also have right angle brackets to screw the corners together from the inside, to give extra strength. When they are screwed together, they will line up nicely.


And here is the giant pile of timber ready to be assembled - enough for 2 1m x 1m beds, 2 2.4m x 1m beds and 4 2m x 1m beds. I think that should be plenty for all our fruit, veg and herb needs. We will reticulate each bed individually, so the water can be turned off when the bed is fallow. Mom reckons we'll be like the people in "The Good Life".